Use asserts to verify the expected result
In software development, automated tests typically follow an “Arrange-Act-Assert” structure: the test prepares a defined initial state (Arrange), then it performs the tested action (Act), and finally it verifies the expected result (Assert).
While AIVA doesn’t force you to follow any specific structure, we do suggest that you end your tests with one or more Assert steps.
Without an explicit Assert, AIVA does verify that the recorded scenario can be executed and all the clickable elements (menu items, buttons, input fields...) can be found. However, the last step might end with an error message rather than a successful result, and from AIVA’s perspective it would still look like a passed test if there is no Assert step to verify the result.
Use these tools in the toolbar during recording a test to add an assertion:
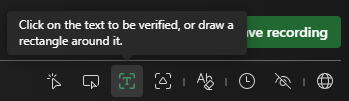
- Assert text: After selecting the tool, you can simply click the text to be verified, or draw a rectangle around it.
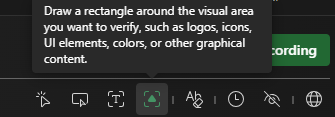
- Assert image: After selecting the tool, you can draw a rectangle around the image to be verified.
When to use which assert tool
- Assert text: Use this to verify that specific text appears (or does not appear) on the screen.
- Assert image: Use this to verify visual elements such as buttons, icons, colors, layouts, or hover effects.
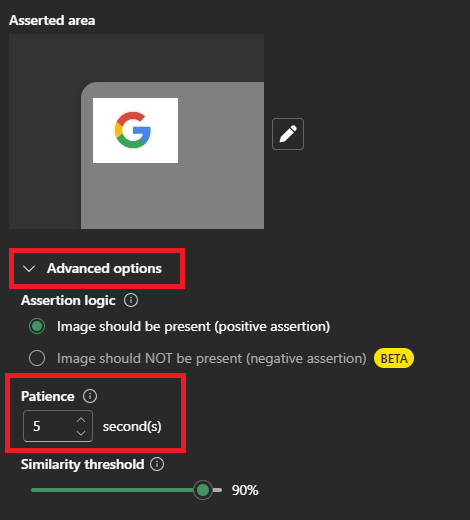
Assert advanced options
You can configure additional options for assertions, including assertion logic, patience, and threshold (for image assertions).
Defining the assertion logic
Assertions can be either positive or negative:
- Positive assertion: verifies that a text or image is present.
- Negative assertion: verifies that a text or image is not present.
Example: After submitting a valid form, add an assertion for the red validation icon to not be present, confirming that no input errors were triggered during submission.
Note: Currently, the negative image option is in Beta implementation.
Modify the image similarity threshold
When using Assert image, you can adjust the threshold to control how closely the compared images must match.
- A higher threshold requires greater similarity,
- A lower threshold allows for more variation.
This is useful when dealing with minor UI differences such as rendering variations, animations, or dynamic content.
Example (high threshold): After navigating to the dashboard, add an assertion for a static icon with a threshold of 90–95%, ensuring that even minor visual changes will cause the test to fail.
Example (low threshold): After hovering over a button, add an assertion for the button image with a threshold of 70%, allowing for small visual differences such as color or shadow changes while still verifying the correct element.
Use asserts also for waiting
If your test scenario needs to wait for the tested app to load, do something, or reach some state, avoid using a timed delay. Instead, use an assertion with patience.
What does that mean? Insert an Assert step in your test scenario, verifying that the desired text, or image appears on the tested page, and configure its Patience as the maximum time AIVA should wait for it to appear.
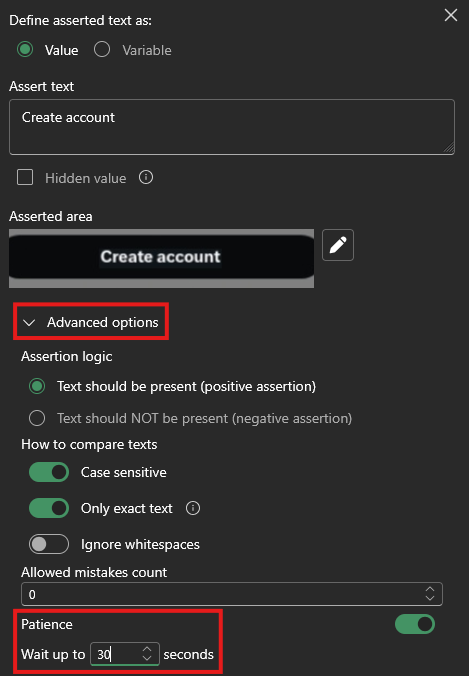
That way, AIVA will not wait for a fixed length of time, but will instead act just like a real user: it will wait just until the expected result appears, but only until its patience runs out.
Example: After you click “Submit” on a form, add an assertion for the text “Thank you for your order” to appear, with a patience of 10–15 seconds. AIVA will now wait only as long as needed — instantly continuing if the page is fast, or up to the patience limit if it’s slow — instead of blindly pausing for a fixed number of seconds every time.
The default patience is rather short. If you do want AIVA to wait, you will need to increase it.
Keep the area for Assert image tight around the image to be verified
When selecting an area for Assert image, try to include as little background as possible.
A larger selection may include irrelevant details, making the assertion less reliable. Small visual differences in a large area might not trigger a failure, even if the target element has changed.
For best results:
- Focus tightly on the element you want to verify,
- Avoid unnecessary surrounding space.
If you need to verify text within a UI element (such as a button), consider using Assert text instead for greater accuracy.
Example: After identifying a “Submit” button, draw a tight selection around only the button and add an image assertion, ensuring that the verification focuses precisely on the element without being affected by surrounding content.